DIY!!
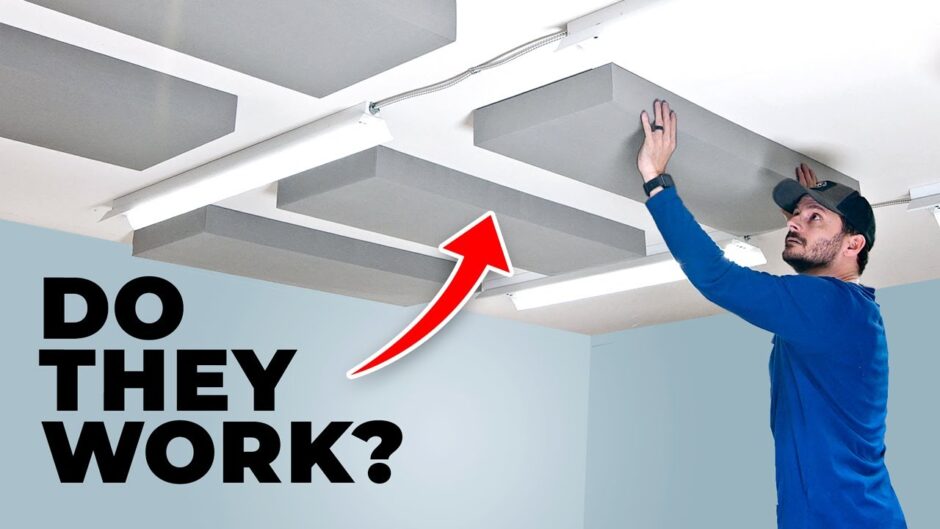
DIY Acoustic Panels to reduce echo in my woodworking workshop and film recording studio. These sound panels are cheap and easy to build for less than $20 a piece.
This video is sponsored by The Home Depot
🎥 What to Watch Next:
13 Shop Storage Tips – https://youtu.be/kWKqHPhTe6M
Cordless Drill Charging Station – https://youtu.be/6XbnNkae5n4
Mobile Wood Storage Cart – https://youtu.be/_0H71D7dSDQ
➤Plans from this build:
Modular Garage Cabinets bundle (Save 30%) – https://fixthisbuildthat.com/garagecabinets
Mobile Lumber Cart – https://fixthisbuildthat.com/mobilewoodcartplans
➤Join the FTBT Builders Club!!! http://bit.ly/2abkaSV
More content, early access, FREE plans, video credits
➤Tools/Supplies Used (affiliate):
Crescent Wiss 7in Utility Shears – https://bit.ly/3FXJCIJ
Werner 22’ Multi-Position Pro Ladder – https://bit.ly/3D3G3yV
Kreg Track Saw – https://bit.ly/3E4LsHj
Rockwool Safe and Sound – https://bit.ly/3rkwuJM
Pneumatic Stapler – https://bit.ly/3xzd2K6
Husky 4.5 gal Silent Compressor – https://bit.ly/3qGaAwG
3M Half-latch respirator – https://bit.ly/3E5EKkk
3M P100 filters – https://bit.ly/3FTOcrq
Franklin Sensor Stud Finder – https://bit.ly/3I70DC0
ISOtunes Bluetooth Hearing Protection – http://bit.ly/2Ru4Es8 (10% off code: FTBT)
➤Support the FTBT Channel:
Buy FTBT Woodworking Plans: https://fixthisbuildthat.com/plans
Buy FTBT Merch: https://bit.ly/2YgiHnd
Links to My Tools & Gear: http://bit.ly/FTBT-tools
Subscribe: http://bit.ly/FTBT-youtube
➤Thank you to these partners for supporting my channel. Go check them out!
Woodcraft: http://bit.ly/2qP7JIs
Kreg Tool: https://amzn.to/2FXZIGp
ISOtunes: http://bit.ly/2Ru4Es8 (10% off code: FTBT)
TimberlandPRO: https://bit.ly/2Zm1r1n
➤FOLLOW ME on Social Media:
Instagram – http://www.instagram.com/fixthisbuildthat
Facebook – http://www.fb.com/ibuildthat
Twitter – http://www.twitter.com/fixthisbuildtht
Pinterest – http://www.pinterest.com/fixthisbuildtht
➤Referenced people/videos:
Alexandre Chappel – https://youtu.be/XIP2Mix_bwM
Music Licensed through Epidemic Sound – Get a FREE month: https://bit.ly/3qCwWiW
#acousticpanels #soundpanels


It sounds a lot better to my ears in the shop! How do you think the sound difference came across on the video?
It sounds a lot better to my ears in the shop! How do you think the sound difference came across on the video?
I did basically the same design a few weeks ago for the dance room at my house! It made an enormous difference. I like your French cleat system; it makes mounting a lot easier than what I had planned.
One suggestion: you can get even cheaper fabric by getting old bedsheets at the thrift store. My local thrift store sold sheets for $2–3, and you could get two panels out of a single sheet.
I build arcades from 3/4″ MDF and to get the cut edges strong and smooth, coat the cut edges with a mix of 5 part water to 1 part wood glue. Dab it on with a foam brush, wait for it to dry, then sand the pebbly surface with 120 grit and Bob’s your uncle. The edges will be much more damage resistant. I use this since I normally have to cut a groove for the T-molding and this re-inforces the MDF.
Panels should be hanging down on edge exposing both sides of the insulation. Sound waves going up will bounce and decay between the panels, the few to reach the ceiling will hit the panels on the way back down and die off.
I like what you did, but acoustically, you need to mitigate first reflections the most. Those will be the opposite wall from where you are speaking. If you don’t have much wall space to reduce the volume of reflections, you might be able to put in diffusers on the doors… just a series of panels as slightly different depths and angles that will reduce slap back transients by spreading acoustic energy over time.
I like what you did, but acoustically, you need to mitigate first reflections the most. Those will be the opposite wall from where you are speaking. If you don’t have much wall space to reduce the volume of reflections, you might be able to put in diffusers on the doors… just a series of panels as slightly different depths and angles that will reduce slap back transients by spreading acoustic energy over time.
I can hear some difference in sound. It’s a slight reduction. The shotgun mic is likely picking up side-to-side/front-to-back reflections as well. Understanding the real estate of the walls is challenging, if theres a way to add abatement to any vertical surfaces, that can also be helpful. I enjoyed the video and the craftsmanship, for sure! Oh, and asymmetrical is ok, as sound bouncing from one surface can be caught on the opposite surface, etc. Helps get a better bang for the buck with some reduced coverage (when it comes to walls). I understand the aesthetics of the ceiling, though. 🙂
I have been considering building some of these for my home office and am so glad to see this video drop today! Also, asymmetry is actually good for acoustic dampening as it helps to break up some frequency reflectance.
These are great, Brad! Having done a fair bit of audio engineering in my career, I’ve found that recording in an echo-y shop environment isn’t terrible. Using a lapel (as you do for most of your VO work) helps. There are some VST plugins out there that remove echo automatically in post production. That said, adding floating panels 2-3′ above your head could provide some additional dampening of close range reflections and help mitigate longer reflections from above. Angling them slightly (as to not be coplanar with hard surfaces) away from your microphone at slight angles sometimes helps, too. It’s diminishing returns at some point, however – especially in high ceiling shops with lots of hard surfaces.
I built very similar panels several years ago for my studio. Except I used 1×4’s (I think) and Rockwool rigid panels. Because they were to hang on the walls, I had a different hanging system but at the time I had never even heard the term “French cleat.” Definitely made a difference!
The new editing style looks awesome! The different speeds of the more repetitive tasks, the tracking dolly, and the fade from lifting up the fabric to it being on the bench in the next shot! Very smooth and stylish man!
I’ve considered building cabinet doors with a fabric or Homosote “recessed panel” to get more soft surfaces in the shop.
Drop ceiling are good for acoustics too.
It definitely helps. To give you pretty close to DOUBLE the sound control … get them at least a few inches down from the ceiling. Then they capture the reflections both directly into the side facing you and they also catch the reflections off the ceiling. I know … not a great time to hear that after you just finished the nice french cleat mounting … but coming from a music studio background I can tell you it makes a HUGE difference. You would also benefit from taking a handful of them off the ceiling and get them on the walls that are the first reflection points from where you stand at your bench, also a few inches off the wall. You’ll find that the majority of the reflections from a voice, because you are facing in specific directions, will be captured better on walls that ceilings. Since you are using a shotgun mic also consider the reflection points for it’s capsule relative to where you’re standing. Have your wife hold a mirror at the left and right walls and when you can see the mic capsule in the mirror … put a panel there.
It definitely helps. To give you pretty close to DOUBLE the sound control … get them at least a few inches down from the ceiling. Then they capture the reflections both directly into the side facing you and they also catch the reflections off the ceiling. I know … not a great time to hear that after you just finished the nice french cleat mounting … but coming from a music studio background I can tell you it makes a HUGE difference. You would also benefit from taking a handful of them off the ceiling and get them on the walls that are the first reflection points from where you stand at your bench, also a few inches off the wall. You’ll find that the majority of the reflections from a voice, because you are facing in specific directions, will be captured better on walls that ceilings. Since you are using a shotgun mic also consider the reflection points for it’s capsule relative to where you’re standing. Have your wife hold a mirror at the left and right walls and when you can see the mic capsule in the mirror … put a panel there.
If the fabric is made of cotton or linen, you can spray with water and as it dries it’ll tighten up. That’s what I do with my canvas painting surfaces to get rid of wrinkles. Cheers!
If the fabric is made of cotton or linen, you can spray with water and as it dries it’ll tighten up. That’s what I do with my canvas painting surfaces to get rid of wrinkles. Cheers!
That rhythmic stapling sequence—very satisfying! Also, asthmatics unite! Dust-free workspaces are the best.
That rhythmic stapling sequence—very satisfying! Also, asthmatics unite! Dust-free workspaces are the best.
LOL I love that you have a note on your camera that says, “Check MIC plug!” I need one of those as well as one that says, “Don’t forget to hit REC button!” LOL
LOVE your content Brad and hope to collaborate with you or see you at WBC some day!
Turned out great! 💪🔥
Turned out great! 💪🔥
French cleats are genius!! 🔥🔥
French cleats are genius!! 🔥🔥
I just wanted to comment that the editing on all of your videos is really good and this one was particularly well done. Kudos to whomever is doing the work.
I just wanted to comment that the editing on all of your videos is really good and this one was particularly well done. Kudos to whomever is doing the work.
Nice video. In my experience using acoustic panels, there’s a big benefit in addressing the corners of the walls. In your case, if you mount a few more panels on the vertical walls where the top of the vertical wall meets the ceiling–and I mean that the large surface of the panel is on the vertical wall, and the long side of the acoustic panel is tight to the ceiling, you will see a big benefit for not many more $$$$. One other thing you could do might be to hang a couple of panels from their sides, hanging them from their sides in a vertical orientation parallel to all those cabinets. I bet you’ve seen this done in gymnasiums and indoor pools and such. One might think that if the abatements are hanging up high and not directly in front of the cabinets that they would do little to affect reflections off those cabinets. However, sound waves bounce on and off flat surfaces at many angles, and the hanging panels catch a lot more reflections than you think.
Acoustician/Sound Designer here. You got a good tip earlier to put some spacers between your cleats and the ceiling. That will give you additional absorption. Also, there’s a commercial line of Rockwool that is WAY cheaper than the acoustic line (for the same product). Different markets, different prices. Shop it at HVAC or fireproofing sources rather than audio sources. Also, always opt for the 4″ over the 3″, as it gives you a lot more absorption bang for each panel.
These are a little over-engineered on the MDF. They only need to hold themselves up. If you were making these for a commercial use, you’d want to run hardware cloth, then tack on some quarter round to stretch the fabric. That way, you’re not holding up any of the weight of the rockwool with the decorative cloth, and you won’t ever see sags.
Couple more suggestions: You need some panels on the walls. You only have to treat ONE wall on any parallel set, and you don’t have to treat it completely. But you’re still getting really significant flutter echo in that plane, and your sound quality could be instantly 100% better. Since you can do all the building, you can get a studio sound in that shop for pennies, and it will make a huge difference in your video product.
Diffusion: That’s the term for what your wood rack was doing. Bookshelves, tool shelves, any surface that modulates somehow gives you diffusion. Your table saw, and tools on the ground do it, too. There’s a product called a T-Fusor made by Auralex. If you look at it closely, you can see that they just built positive molds and vacuformed plastic over them. Diffusion scatters the sound that hits it rather than absorbing it, so it works to reduce echo between surfaces where it’s impossible to treat one side. For you, this is the floor.
If you figured out a way to knock off the T-Fusors (that works for you), then I’d pull out every third absorber you put on the ceiling, and move them to the walls to the left and right of the area where you’re shooting. Replace the absorbers you pulled with diffusors. It will immediately make a difference.
This is ridiculously condensed and general. For a pretty good beginner’s overview of acoustic treatment, look for the “Acoustics 101” PDF from the Auralex site.
If I were to prioritize the above, the main thing I’d be trying to treat is the wall opposite your camera angle, i.e., behind where the camera is placed in this video. And then, I’d stagger a few absorbers on the walls to the left and right of your camera position. Just remember that wherever you place an absorber on the left wall, don’t place it on the right wall, and vice versa. You want to leave some reflection. You just want it to get absorbed after the first bounce to avoid what you hear when you clap…hundreds of short-order reflections, ping-ponging between the walls. That’s the stuff that reduces your vocal intelligibility. When you get it right, you’ll be amazed at the improvement.
By the way, I noticed that you said you were using a shotgun. We don’t actually use those indoors in untreated space. They do work like a telephoto lens, to isolate the pickup pattern to a tiny cone in front of the mic. Unfortunately, though, that comes at a cost, and shotguns pick up a lobe directly behind as well as directly in front. That’s why treating the wall behind the camera will be necessary for you, as your mic is picking up a lot of ping-pong reflection from that wall.
Hope that helps.
Nice video – the french cleat is the bomb. You can improve the efficiency of your panels (roughly x2) by spacing them off the ceiling. Add a spacer block to your french cleat that’s mounted to the ceiling. You want the distance from the ceiling to match the thickness of the panel. It’ll be a dust ‘shelf’ in your shop but you will definitely notice an improvement.
Quick rule of thumb, a 2″ acoustic panel with a 2″ air gap off the ceiling or wall will give you the same effective sound control as an equivalent 4″ panel attached directly to the surface. Double the efficiency, and only 1/2 the cost. You can still use your french cleats too….just put spacers between the cleat and the roof. Just a suggestion. Its an easy fix. Seriously you went this far might as well do a comparison of all three Before/After/and then one with the air gap…..I would love to hear the final result. Good luck.
Quick rule of thumb, a 2″ acoustic panel with a 2″ air gap off the ceiling or wall will give you the same effective sound control as an equivalent 4″ panel attached directly to the surface. Double the efficiency, and only 1/2 the cost. You can still use your french cleats too….just put spacers between the cleat and the roof. Just a suggestion. Its an easy fix. Seriously you went this far might as well do a comparison of all three Before/After/and then one with the air gap…..I would love to hear the final result. Good luck.
Cool video! I build panels like this for drum rooms. If the fabric sags from the weight of the insulation over time, you can add a few thin wires under the fabric to give the insulation a hard barrier inside the frame — if you make free-standing versions, you can use chicken wire like a cage under the fabric, then add ski-style feet for them to move around the floor as needed. Thanks for the great content!
Good job! I’ve used Safe N Sound in the ceiling in my home recording studio ( its much nicer to work with than OC compressed fiberglass). I can hear a slight improvement, but unfortunately you still have the other 5 surfaces reflecting. a workshop with cabinets is a tough one . Anything you can do to break up the long parallel hard surfaces will help.
I just made 108 of these panels based on your video. I hung them on the walls of a school auditorium. Thanks for the inspiration!